Multiple cameras showing a semi-unified pointcloud
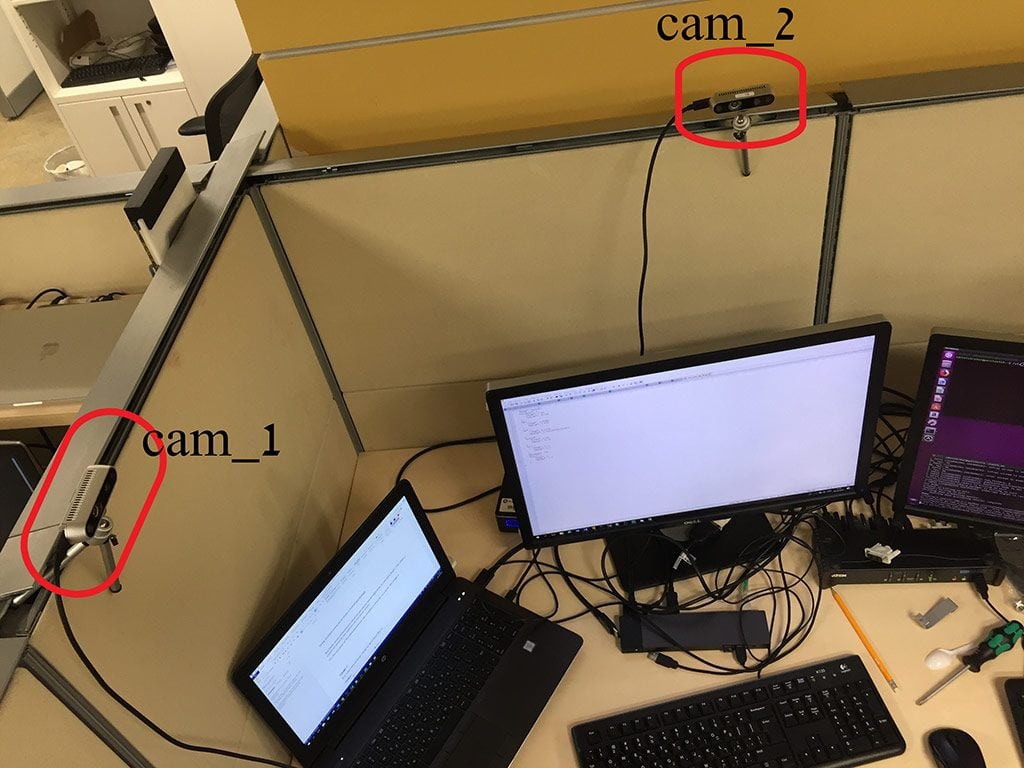
The D430 series of RealSense cameras use stereo based algorithm to calculate depth. This mean, a couple of cameras can operate on the same scene. For the purpose of this demonstration, we coupled 2 cameras to look at the same scene from 2 different points of view. See image:

The schematic settings could be described as:
X--------------------------------->cam_2
| (70 cm)
|
|
| (60 cm)
|
|
/
cam_1
The cameras have no data regarding their relative position. That’s up to a third party program to set (see step 3).
Step 1: Obtaining cameras’ serial number
If you already know each camera’s serial number you can skip this step. Otherwise,
- open terminal and change directory to catkin_ws
- Make sure only cam_1 is connected and start the realsense2_camera wrapper:
roslaunch realsense2_camera rs_camera.launch
Note the serial number it did find in the following log line:
[ INFO] [1538983051.813336379]: setupDevice...

[ INFO] [1538983051.813399792]: JSON file is not provided

[ INFO] [1538983051.813427820]: ROS Node Namespace: camera

[ INFO] [1538983051.813442869]: Device Name: Intel RealSense D435

[ INFO] [1538983051.813605893]: Device Serial No: 728312070349

[ INFO] [1538983051.813622583]: Device FW version: 05.10.03.00
The serial number is: 728312070349 Write it down somewhere and terminate the node using ctrl+C.
Repeat the step with now only cam_2 connected.
Step 2: Start both cameras
Open 2 terminals (and change directory to catkin_ws directory).
In terminal 1 enter the following: (don't forget to replace 728312070349 with the real serial number:
roslaunch realsense2_camera rs_camera.launch camera:=cam_1 serial_no:=728312070349 filters:=spatial,temporal,pointcloud_
In terminal 2 enter the following: (again, fill the correct serial number for cam_2)
roslaunch realsense2_camera rs_camera.launch camera:=cam_2 serial_no:=<serial_number_2> filters:=spatial,temporal,pointcloud_
Now we have 2 topics of PointCloud2 published.
Step 3: Publish spatial connection between cameras
We estimate the translation of cam_2 from cam_1 at 70(cm) on X-axis and 60(cm) on Y-axis. We also estimate the yaw angle of cam_2 relative to cam_1 as 90(degrees) clockwise. To simplify things, the coordinate system of cam_1 will serves as the coordinate system for the whole scene. These are the initial parameters we set for the transformation between the 2 cameras.
The following script calculates the transformation between the 2 cameras from the given parameters and publish the frame transformation.
Open terminal 3:
cd catkin_ws
python src/realsense/realsense2_camera/scripts/set_cams_transforms.py cam_1_link cam_2_link 0.7 0.6 0 -90 0 0
Step 4: Visualizing the pointclouds and fine-tune the camera calibration
Open terminal 4 and run RViz:
rviz
In RViz window, do the following:
Set “Fixed Frame” to “cam_1_link”
Add -> By topic -> /cam_1/depth/color/points/PointCloud2
Add -> By topic -> /cam_2/depth/color/points/PointCloud2
Now both point clouds are shown together. If you looked closely it’s easy to see that the clouds are not exactly in position. Some features are duplicated. Now it’s time for fine calibration:
Switch to terminal 3, where set_cams_transforms.py is still running. Use it to fine calibrate cam_2 relative to cam_1.
The instructions are printed by the program:
Using default file /home/doronhi/catkin_ws/src/realsense/realsense2_camera/scripts/_set_cams_info_file.txt
Use given initial values.
Press the following keys to change mode: x, y, z, (a)zimuth, (p)itch, (r)oll
For each mode, press 6 to increase by step and 4 to decrease
Press + to multiply step by 2 or - to divide
Press Q to quit
Below that a constantly updating line is printed, showing the current mode, value and step size after every key stroke.
Notice, that the program prints the path of the current configuration file. It saves its last configuration automatically, all the time, to be used on the next run. If you played it a while and want to back up the configuration file, just copy it aside. Read the manual, by running without any parameters, to learn more about changing the configuration filename.
There is no question that it would be much better to find the precise matrix between the cameras automatically. In the meanwhile, After a lot of fiddling around, I was relatively satisfied with the following numbers:
| x | 0.75 |
| y | 0.575 |
| z | 0 |
| azimuth | -91.25 |
| pitch | 0.75 |
| pitch | 0 |
The result is a more complete cover of the scene:
Updated over 4 years ago
