
rs-trajectory
In order to run this example, a device supporting pose stream (T265) is required.
Overview
This sample demonstrates how to draw the trajectory of the device's movement based on pose data.
Expected Output
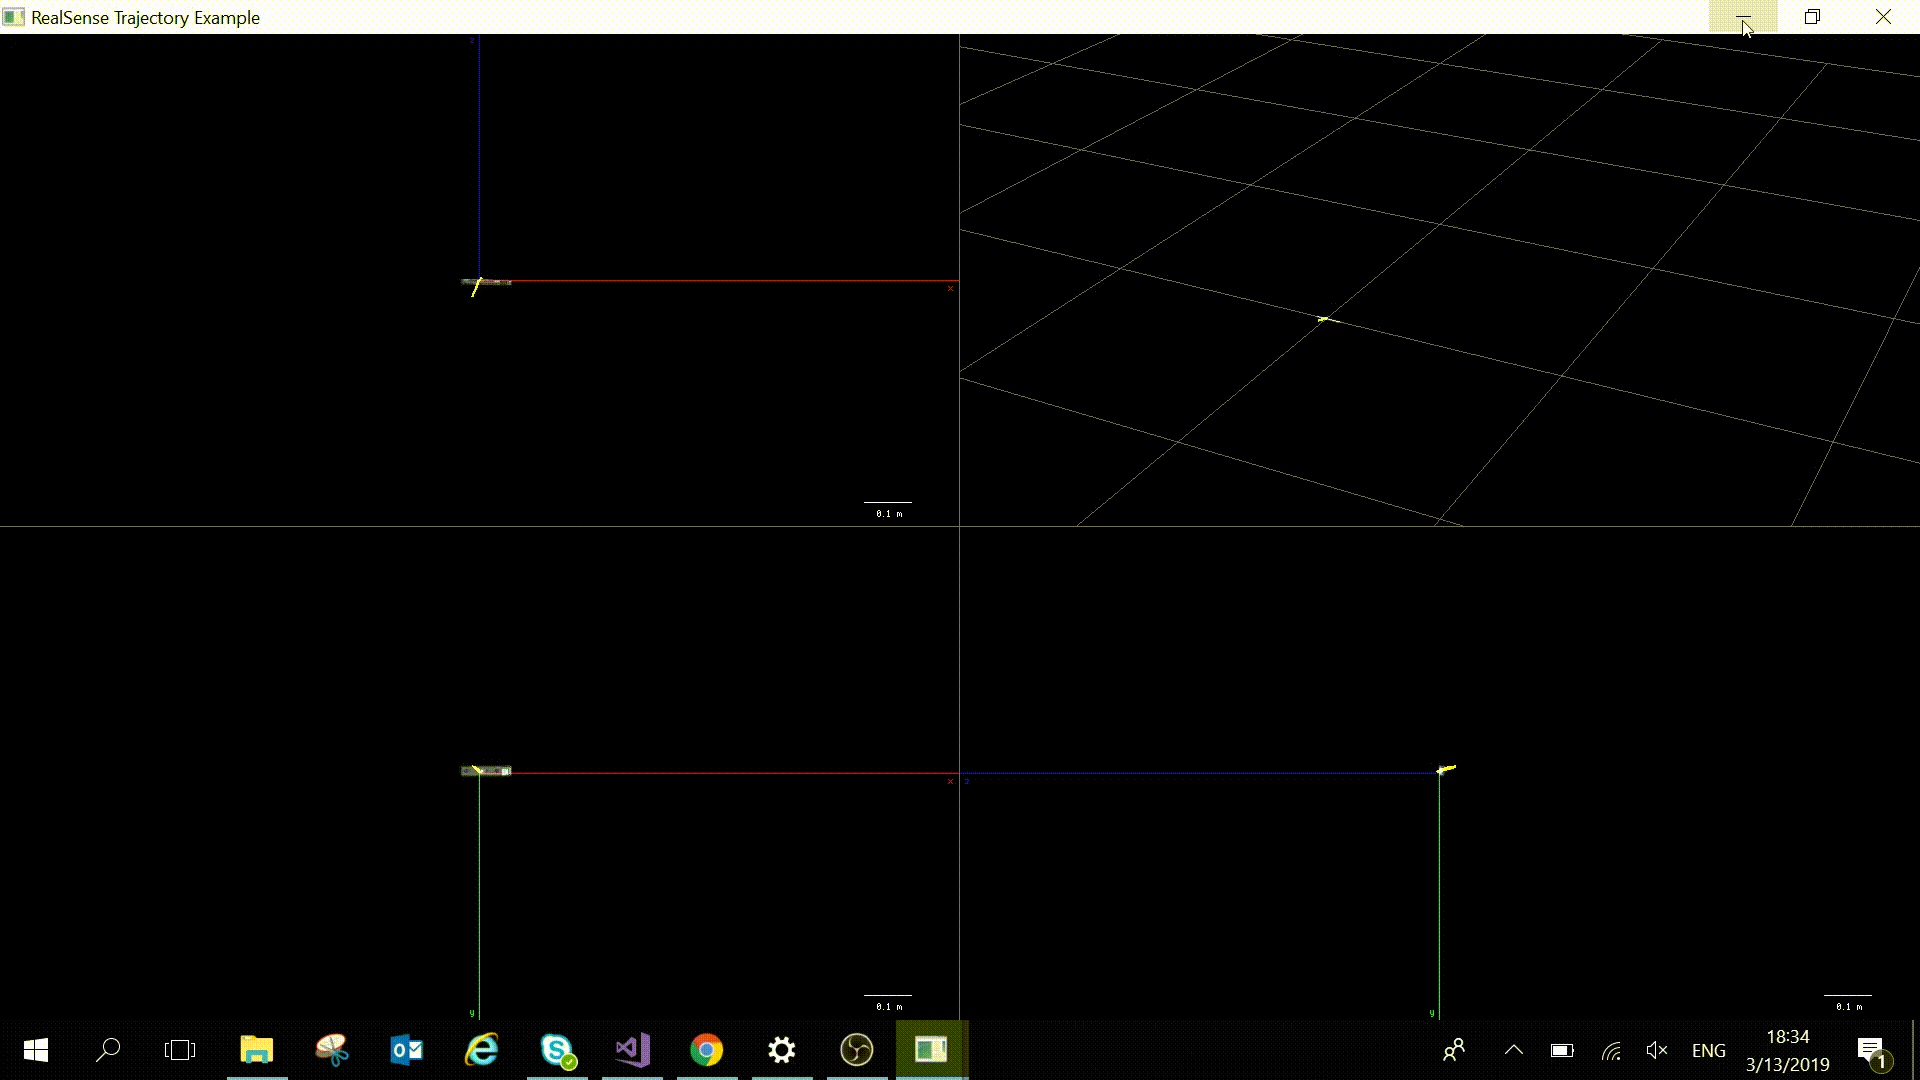
The application should open a window split into 4 viewports: top (upper left viewport), front (lower left viewport), side (lower right viewport) and 3D (upper right viewport). In each viewport, a 3D model of the camera and the corresponding 2D trajectory are rendered.
In the 3D view, you should be able to interact with the camera using your mouse, for rotating, zooming and panning.
Code Overview
First, we include the Intel® RealSense™ Cross-Platform API.
#include <librealsense2/rs.hpp> // Include RealSense Cross Platform API
In this example we will also use the auxiliary library of example.hpp:
#include "../example.hpp"
We define a struct tracked_point to store a single point of the trajectory with it's confidence level.
struct tracked_point
{
    rs2_vector point;
    unsigned int confidence;
};
We'll use the class tracker to keep track of the device's movement: calculate new transformation matrices, store trajectory points and draw them.
This class holds a vector of the trajectory's points and also the minimal and maximal coordinates, to allow zooming out according to the trajectory's size.
std::vector<tracked_point> trajectory;
rs2_vector max_coord;
rs2_vector min_coord;
The function calc_transform calculates the transformation matrix in relation to the initial state, based on pose data from the device. It uses the rotation data in quaternions and translation data in meters to compute the resulting matrix. Note that we use coulmn-major representation as required by OpenGL. A rotation by 180 degrees in the y axis is applied to set the correct orientation.
void calc_transform(rs2_pose& pose_data, float mat[16])
{
    auto q = pose_data.rotation;
    auto t = pose_data.translation;
    // Set the matrix as column-major for convenient work with OpenGL and rotate by 180 degress (by negating 1st and 3rd columns)
    mat[0] = -(1 - 2 * q.y*q.y - 2 * q.z*q.z); mat[4] = 2 * q.x*q.y - 2 * q.z*q.w;     mat[8] = -(2 * q.x*q.z + 2 * q.y*q.w);      mat[12] = t.x;
    mat[1] = -(2 * q.x*q.y + 2 * q.z*q.w);     mat[5] = 1 - 2 * q.x*q.x - 2 * q.z*q.z; mat[9] = -(2 * q.y*q.z - 2 * q.x*q.w);      mat[13] = t.y;
    mat[2] = -(2 * q.x*q.z - 2 * q.y*q.w);     mat[6] = 2 * q.y*q.z + 2 * q.x*q.w;     mat[10] = -(1 - 2 * q.x*q.x - 2 * q.y*q.y); mat[14] = t.z;
    mat[3] = 0.0f;                             mat[7] = 0.0f;                          mat[11] = 0.0f;                             mat[15] = 1.0f;
}
The function add_to trajectory appends a new point to the trajectory vector. The first point is always added and set as the min and max coordinates.
void add_to_trajectory(tracked_point& p)
{
    // If first element, add to trajectory and initialize minimum and maximum coordinates
    if (trajectory.size() == 0)
    {
        trajectory.push_back(p);
        max_coord = p.point;
        min_coord = p.point;
    }
If the point is not the first one, check if it's far enough from the previous point. If the two last points are too close (less than 1 mm apart), only the one with higher confidence stays in the trajectory. This way, points which don't add new information are discarded to save space.
If a new point is inserted, maximum and minimum coordinates are updated.
else
{
   // Check if new element is far enough - more than 1 mm (to keep trajectory vector as small as possible)
   rs2_vector prev = trajectory.back().point;
   rs2_vector curr = p.point;
   if (sqrt(pow((curr.x - prev.x), 2) + pow((curr.y - prev.y), 2) + pow((curr.z - prev.z), 2)) < 0.001)
   {
       // If new point is too close to previous point and has higher confidence, replace the previous point with the new one
       if (p.confidence > trajectory.back().confidence)
       {
           trajectory.back() = p;
           update_min_max(p.point);
       }
   }
   else
   {
       // If new point is far enough, add it to trajectory
       trajectory.push_back(p);
       update_min_max(p.point);
   }
}
draw_trajectory draws all points stored in the trajectory vector. Low confidence points are colored red, medium confidence - yellow, and high confidence is colored green. Grey points indicate failure in pose retrieval.
void draw_trajectory()
{
    float3 colors[]{
        { 0.7f, 0.7f, 0.7f },
        { 1.0f, 0.0f, 0.0f },
        { 1.0f, 1.0f, 0.0f },
        { 0.0f, 1.0f, 0.0f },
    };

    glLineWidth(2.0f);
    glBegin(GL_LINE_STRIP);
    for (auto&& v : trajectory)
    {
        auto c = colors[v.confidence];
        glColor3f(c.x, c.y, c.z);
        glVertex3f(v.point.x, v.point.y, v.point.z);
    }
    glEnd();
    glLineWidth(0.5f);
}
Class view is a base class which provides functions for rendering the four views on screen. It holds a reference to tracker and camera_renderer objects, which allow rendering of the trajectory and the 3D camera model, respectively.
protected:
    float width, height;
    float aspect;
    tracker& t;
private:
    camera_renderer& renderer;
The function load_matrices sets a viewport, using position (pos) and size (app_width, app_height) passed as parameters. We use glScissor to avoid rendering outside of the viewport window.
void load_matrices(float2 pos, float app_width, float app_height)
{
    width = app_width;
    height = app_height;
    aspect = height / width;

    // Set viewport to 1/4 of the app window and enable scissor test to avoid rendering outside the current viewport
    glViewport(pos.x, pos.y, width / 2, height / 2);
    glEnable(GL_SCISSOR_TEST);
    glScissor(pos.x, pos.y, width / 2, height / 2);
We use glOrtho to set the projection matrix. We define the viewport to cover 2 meters in width, the origin being in the middle of the viewport window. This will allow us to conveniently keep track of the viewport scale in meters.
    // Setup orthogonal projection matrix
    glMatrixMode(GL_PROJECTION);
    glPushMatrix();
    glOrtho(-1.0, 1.0, -1.0 * aspect, 1.0 * aspect, -100.0, 100.0);

    glMatrixMode(GL_MODELVIEW);
    glPushMatrix();
    glLoadIdentity();
}
clean_matrices returns the viewport to it's default configuration, by popping matrices pushed in load_matrices and setting the viewport back to full size.
void clean_matrices()
{
    // Pop LookAt matrix
    glPopMatrix();
    // Pop Projection matrix
    glMatrixMode(GL_PROJECTION);
    glPopMatrix();
    // Set viewport back to full screen
    glViewport(0, 0, width, height);
    glDisable(GL_SCISSOR_TEST);
}
draw_cam_trajectory renders both the trajectory and the camera model. The parameters angle and axes define the initial position of the camera and trajectory, to match the direction of the 2 axes shown in each viewport.
void draw_cam_trajectory(float angle, float3 axes, float r[16])
{
    glPushMatrix();
    // Set initial camera position (rotate by given angle)
    glRotatef(angle, axes.x, axes.y, axes.z);
    t.draw_trajectory();
Matrix r is the trasnformation matrix calculated from the device. We apply this matrix before rendering the camera, so that the camera model moves according to the device's actual movement.
    glMultMatrixf(r);
    renderer.render_camera();
    glPopMatrix();
}
Class view_2d inherits from view and is responsible for handling the 2D viewports. In addition to fields stored in view, view_2d also has members needed to zoom-out the view according to trajectory size: window_borders stores the maximum coordinates of the viewport window; scale_factor holds the current scale in relation to the initial state. lookat_eye is used to set a different perspective for each viewport.
draw_view renders the 2D view. It accepts as parameters the position of the viewport, it's size, the position of the scale bar - scale_pos and the transformation matrix r.
First, we call display_scale which calculates the current scale of the viewport in meters and prints it. It also returns the width of the scale bar which matches the calculated scale.
void draw_view(float2 pos, float width, float height, float2 scale_pos, float r[16])
{
    // Calculate and print scale in meters
    float bar_width = display_scale(scale_factor, scale_pos.x, scale_pos.y);
We set min_coord and max_coord which we'll use to check if zooming-out is needed.
load_matrices is called to prepare the viewport for rendering and the scale bar is rendered using bar_width we previously obtained.
rs2_vector min_coord = t.get_min_coord();
rs2_vector max_coord = t.get_max_coord();

// Prepare viewport for rendering
load_matrices(pos, width, height);
glBegin(GL_LINES);
// Draw scale bar
glColor3f(1.0f, 1.0f, 1.0f);
glVertex3f(0.8, -0.9 * aspect, 0); glVertex3f(0.8 + bar_width, -0.9 * aspect, 0);
glEnd();
We define the perspective of the viewport using gluLookAt and scale according to the current scale_factor.
// Set a 2D view using OpenGL's LookAt matrix
gluLookAt(lookat_eye.x, lookat_eye.y, lookat_eye.z, 0, 0, 0, 0, 1, 0);
// Draw axes (only two are visible)
draw_axes();
// Scale viewport according to current scale factor
glScalef(scale_factor, scale_factor, scale_factor);
If the trajectory's new maximal or minimal coordinates are beyond the window borders, we zoom out by scaling the viewport, in order to keep the whole trajectory visible. scale_factor and window_borders are updated accordingly. Then, we render the camera and trajectory using draw_cam_trajectory with 180 degrees rotation in the y axis.
// If trajectory reached one of the viewport's borders, zoom out and update scale factor
if (min_coord.*a < -window_borders.x || max_coord.*a > window_borders.x
    || min_coord.*b < -window_borders.y || max_coord.*b > window_borders.y)
{
    glScalef(0.5, 0.5, 0.5);
    scale_factor *= 0.5;
    window_borders.x = window_borders.x * 2;
    window_borders.y = window_borders.y * 2;
}
// Draw trajectory and camera
draw_cam_trajectory(180, { 0, 1, 0 }, r);
// Return the default configuration of OpenGL's matrices
clean_matrices();
Similarly, class view_3d handles rendering of the 3D view. We use the function render_scene to handle manipulations by the user. draw_cam_trajectory is called with a parameter of 90 angles rotation in the x angle.
void draw_view(float2 pos, float app_width, float app_height, glfw_state app_state, float r[16])
{
    // Prepare viewport for rendering
    load_matrices(pos, app_width, app_height);
    // Set the scene configuration and handle user's manipulations
    render_scene(app_state);
    // Draw trajectory and camera
    draw_cam_trajectory(90, { 1, 0, 0 }, r);
    // // Return the default configuration of OpenGL's matrices
    clean_matrices();
}
The class split_screen_renderer handles the 4 viewports. It stores 3 objects of view_2d: top, front and side, and one object of view_3d: three_dim.
draw_windows calls each object's draw_view function, and also handles some graphical functionalities: drawing the labels of the axes, as well as each viewport's title and the borders between viewports.
void draw_windows(float app_width, float app_height, glfw_state app_state, float r[16])
{
    // Clear screen
    glClearColor(0.0f, 0.0f, 0.0f, 0.0f);
    glClear(GL_COLOR_BUFFER_BIT | GL_DEPTH_BUFFER_BIT);

    // Upper left window: top perspective (x and z axes)
    top.draw_view({ 0, app_height / 2 }, app_width, app_height, float2{ float(0.457) * app_width, float(0.49) * app_height }, r);
    // Lower left window: front perspective (x and y axes)
    front.draw_view({ 0, 0 }, app_width, app_height, float2{ float(0.457) * app_width, float(0.99) * app_height }, r);
    // Lower right window: side perspective (y and z axes)
    side.draw_view({ app_width / 2, 0 }, app_width, app_height, float2{ float(0.957) * app_width, float(0.99) * app_height }, r);
    // Upper right window: 3D view
    three_dim.draw_view({ app_width / 2, app_height / 2 }, app_width, app_height, app_state, r);
In the main function, we first initialize the window as well as the camera_renderer, tracker and split_screen_renderer objects.
int main(int argc, char * argv[]) try
{
    // Initialize window for rendering
    window app(1280, 720, "RealSense Trajectory Example");

    // Construct an object to manage view state
    glfw_state app_state(0.0, 0.0);
    // Register callbacks to allow manipulation of the view state
    register_glfw_callbacks(app, app_state);

    // Create objects for rendering the camera, the trajectory and the split screen
    camera_renderer cam_renderer;
    tracker tracker;
    split_screen_renderer screen_renderer(app.width(), app.height(), tracker, cam_renderer);
Then, we initialize rs2::pipeline. We configure it with RS2_STREAM_POSE since we'll only use pose frames, and start the pipeline.
// Declare RealSense pipeline, encapsulating the actual device and sensors
rs2::pipeline pipe;
// Create a configuration for configuring the pipeline with a non default profile
rs2::config cfg;
// Add pose stream
cfg.enable_stream(RS2_STREAM_POSE, RS2_FORMAT_6DOF);

// Start pipeline with chosen configuration
pipe.start(cfg);
In the main loop, we obtain the next pose frame and get it's pose_data.
while (app)
{
    // Wait for the next set of frames from the camera
    auto frames = pipe.wait_for_frames();
    // Get a frame from the pose stream
    auto f = frames.first_or_default(RS2_STREAM_POSE);
    // Cast the frame to pose_frame and get its data
    auto pose_data = f.as<rs2::pose_frame>().get_pose_data();
Using the pose_data, we can calculate the transformation matrix. We use a one dimensional array of length 16 to store the matrix, for convenient work with OpenGL.
float r[16];
// Calculate current transformation matrix
tracker.calc_transform(pose_data, r);
The next point of the trajectory is obtained from the computed transformation matrix. Along with it's confidence level, we try adding the new point to the trajectory vector using add_to_trajectory function.
// From the matrix we found, get the new location point
rs2_vector tr{ r[12], r[13], r[14] };
// Create a new point to be added to the trajectory
tracked_point p{ tr , pose_data.tracker_confidence };
// Register the new point
tracker.add_to_trajectory(p);
Finally, we draw the trajectory of the camera movement so far and render a 3D model of the camera according to it's current pose. The rendering is done from different perspectives in each of the viewports using draw_windows as described above.
// Draw the trajectory from different perspectives
screen_renderer.draw_windows(app.width(), app.height(), app_state, r);
Updated over 5 years ago