
rs-measure
Overview
This tutorial shows simple method for measuring real-world distances using depth data.
Note: Measuring dimensions of real-world objects is one of the obvious applications of a depth camera. This sample is not indented to be a proper measurement tool, but rather to showcase critical concepts.
With better algorithms measurement results can be improved considerably.
In this tutorial you will learn how to:
- Spatially align color stream to depth (as opposed to depth-to-color alignment in rs-align)
- Leverage post-processing to handle missing or noisy depth data
- Convert between 2D pixels and points in 3D space
- Taking advantage of multiple cores to parallelize data flow
- Overlaying color on top of depth using OpenGL
Expected Output
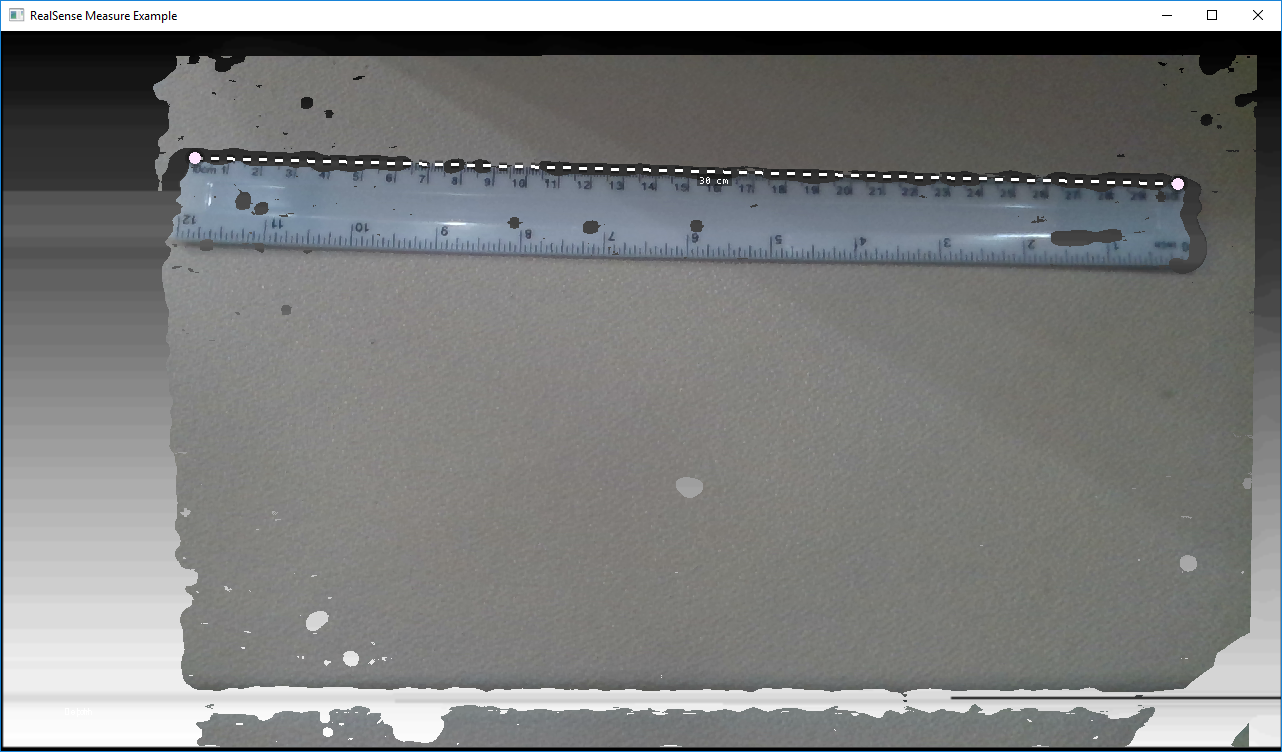
This demo lets the user measure distance between two points in the physical world.
Code Overview
Depth Processing Pipeline
We start this example by defining all the processing blocks we are going to use:
// Colorizer is used to visualize depth data
rs2::colorizer color_map;
// Use black to white color map
color_map.set_option(RS2_OPTION_COLOR_SCHEME, 2.f);
// Decimation filter reduces the amount of data (while preserving best samples)
rs2::decimation_filter dec;
// If the demo is too slow, make sure you run in Release (-DCMAKE_BUILD_TYPE=Release)
// but you can also increase the following parameter to decimate depth more (reducing quality)
dec.set_option(RS2_OPTION_FILTER_MAGNITUDE, 2);
// Define transformations from and to Disparity domain
rs2::disparity_transform depth2disparity;
rs2::disparity_transform disparity2depth(false);
// Define spatial filter (edge-preserving)
rs2::spatial_filter spat;
// Enable hole-filling
// Hole filling is an aggressive heuristic and it gets the depth wrong many times
// However, this demo is not built to handle holes
// (the shortest-path will always prefer to "cut" through the holes since they have zero 3D distance)
spat.set_option(RS2_OPTION_HOLES_FILL, 5); // 5 = fill all the zero pixels
// Define temporal filter
rs2::temporal_filter temp;
// Spatially align all streams to depth viewport
// We do this because:
//   a. Usually depth has wider FOV, and we only really need depth for this demo
//   b. We don't want to introduce new holes
rs2::align align_to(RS2_STREAM_DEPTH);
Next, we configure camera pipeline for depth + color streaming:
// Declare RealSense pipeline, encapsulating the actual device and sensors
rs2::pipeline pipe;

rs2::config cfg;
cfg.enable_stream(RS2_STREAM_DEPTH); // Enable default depth
// For the color stream, set format to RGBA
// To allow blending of the color frame on top of the depth frame
cfg.enable_stream(RS2_STREAM_COLOR, RS2_FORMAT_RGBA8);
auto profile = pipe.start(cfg);
Our goal is to generate depth without any holes, since these are going to pose an immediate problem to our algorithm.
The best way to reduce the number of missing pixels is by letting the hardware do it.
The D400 cameras have a High Density preset we can take advantage of.
auto sensor = profile.get_device().first<rs2::depth_sensor>();

// Set the device to High Accuracy preset
auto sensor = profile.get_device().first<rs2::depth_sensor>();
sensor.set_option(RS2_OPTION_VISUAL_PRESET, RS2_RS400_VISUAL_PRESET_HIGH_ACCURACY);
Given a frame-set, we are going to apply all the processing blocks in order.
First we apply the align processing block to align color frame to depth viewport:
// First make the frames spatially aligned
data = align_to.process(data);
Next, we invoke the depth post-processing flow:
rs2::frame depth = data.get_depth_frame();
// Decimation will reduce the resultion of the depth image,
// closing small holes and speeding-up the algorithm
depth = dec.process(depth);
// To make sure far-away objects are filtered proportionally
// we try to switch to disparity domain
depth = depth2disparity.process(depth);
// Apply spatial filtering
depth = spat.process(depth);
// Apply temporal filtering
depth = temp.process(depth);
// If we are in disparity domain, switch back to depth
depth = disparity2depth.process(depth);
// Send the post-processed depth for path-finding
pathfinding_queue.enqueue(depth);
All stereo-based 3D cameras have the property of noise being proportional to distance squared.
To counteract this we transform the frame into disparity-domain making the noise more uniform across distance.
This will do nothing on our structured-light cameras (since they don't have this property).
We also apply the standard color map:
// Apply color map for visualization of depth
auto colorized = color_map(depth);
Converting between pixels and points in 3D
To convert pixels in the depth image into 3D points we are calling rs2_deproject_pixel_to_point C function (declared in rsutil.h).
This function needs depths intrinsics, 2D pixel and distance in meters. Here is how we fetch depth intrinsics:
auto stream = profile.get_stream(RS2_STREAM_DEPTH).as<rs2::video_stream_profile>();
auto intrinsics = stream.get_intrinsics(); // Calibration data
Distance in meters can be acquired using get_distance function of depth_frame class.
Calling
get_distanceexcessively can result in bad performance, since the compiler can't optimize across module boundaries, so it could be beneficial to read theDEPTH_UNITSoption directly from thedepth_sensorand use it to convert raw depth pixels to meters.
Putting everything together results in rather verbose dist_3d function:
float dist_3d(const rs2_intrinsics& intr, const rs2::depth_frame& frame, pixel u, pixel v)
{
    float upixel[2]; // From pixel
    float upoint[3]; // From point (in 3D)

    float vpixel[2]; // To pixel
    float vpoint[3]; // To point (in 3D)

    // Copy pixels into the arrays (to match rsutil signatures)
    upixel[0] = u.first;
    upixel[1] = u.second;
    vpixel[0] = v.first;
    vpixel[1] = v.second;

    // Query the frame for distance
    // Note: this can be optimized
    // It is not recommended to issue an API call for each pixel
    // (since the compiler can't inline these)
    // However, in this example it is not one of the bottlenecks
    auto udist = frame.get_distance(upixel[0], upixel[1]);
    auto vdist = frame.get_distance(vpixel[0], vpixel[1]);

    // Deproject from pixel to point in 3D
    rs2_deproject_pixel_to_point(upoint, &intr, upixel, udist);
    rs2_deproject_pixel_to_point(vpoint, &intr, vpixel, vdist);

    // Calculate euclidean distance between the two points
    return sqrt(pow(upoint[0] - vpoint[0], 2) +
                pow(upoint[1] - vpoint[1], 2) +
                pow(upoint[2] - vpoint[2], 2));
}
Running Processing on a Background Thread
Post-processing calculations in this example can be relatively slow. To not block the main (UI) thread, we are going to have a dedicated thread for post-processing.
Video-Processing Thread
This thread will consume full frame-sets from the camera, and will produce frame-sets containing color and colorized depth frames (for rendering on the main thread):
while (alive)
{
    // Fetch frames from the pipeline and send them for processing
    rs2::frameset fs;
    if (pipe.poll_for_frames(&fs))
    {
        // Apply post processing
        // ...

        // Send resulting frames for visualization in the main thread
        postprocessed_frames.enqueue(data);
    }
}
Main Thread
The main thread is the only one allowed to render to the screen.
It polls from the postprocessed_frames queue and just displays the results:
while(app) // Application still alive?
{
postprocessed_frames.poll_for_frame(¤t_frameset);
if (current_frameset)
{
auto depth = current_frameset.get_depth_frame();
auto color = current_frameset.get_color_frame();
glEnable(GL_BLEND);
// Use the Alpha channel for blending
glBlendFunc(GL_SRC_ALPHA, GL_ONE_MINUS_SRC_ALPHA);
// First render the colorized depth image
depth_image.render(depth, { 0, 0, app.width(), app.height() });
// Next, set global alpha for the color image to 90%
// (to make it slightly translucent)
glColor4f(1.f, 1.f, 1.f, 0.9f);
// Render the color frame (since we have selected RGBA format
// pixels out of FOV will appear transparent)
color_image.render(color, { 0, 0, app.width(), app.height() });
// Render the simple pythagorean distance
render_simple_distance(depth, app_state, app, intrinsics);
// Render the ruler
app_state.ruler_start.render(app);
app_state.ruler_end.render(app);
glDisable(GL_BLEND);
}
}
We use glBlendFunc to overlay aligned-color on top of depth using colors alpha channel (the stream must be of format RGBA for this to work).
This example demonstrates a short yet complex processing flow. Each thread has somewhat different rate and they all need to synchronize but not block one another.
This is achieved using thread-safe frame_queues as synchronization primitives and rs2::frame reference counting for object lifetime management across threads.
Updated about 6 years ago