Skeleton Tracking SDK Installation guide
Full version of the Getting Started guide is currently available only in PDF version.
1. System Requirements
For Windows based operating systems
– OS: Windows 10
– C++: Microsoft Visual Studio 2017 (recommended 15.8)
– C#: Microsoft .NET Framework version 4.0
– Python: Version >= 3.6
– Unity: Unity 2018.4.x (LTS)
For Unix based operating systems
– OS: Ubuntu 18.04 (LTS) (tested), Other Debian based system are possible (untested)
– C++: Clang 6.0, gcc 7.4
– Python: Version >= 3.6
Hardware
– Platform: x64
– CPUs: 6th to 10th generation Intel® Core™ and Xeon® Processors
– GPUs: Intel® Iris® Pro, Intel® HD Graphics 520, 530, 630
– VPUs: Intel® Movidius™ Neural Compute Stick, Intel® Neural Compute Stick 2
– 3D: 3D Supported Camera among others: Intel® RealSense™ D415 or D435, FRAMOS Depth Camera D435e
2. Windows. Installation and license activation.
- Download the installation package by clicking this link.
- Run the installer cubemos-SkeletonTracking_2.x.x.x.exe as an Administrator.
- Restart your machine.
- To activate the software for the first time run post_installation.bat script available in C:\Program Files\Cubemos\SkeletonTracking\scripts .
- In the opened file dialog enter the license key you acquired.
The following steps take place automatically (a.,b.,c.,d.)
- a. The post_installation.bat script generates the license file (cubemos_license.json)
and copies it together with the neural network models and test-images to the cubemos folder
in %LOCALAPPDATA%.

cubemos SkeletonTracking %LOCALAPPDATA% folder after post installation step
- b. By setting up %LOCALAPPDATA% folder you can access the SkeletonTracking resources in
the most flexible way without the need of permanent administrator permissions. - c. The activation is performed.
- d. activation_key.json is saved in the license folder.
- e. (Optionally) In the post_installation.bat script you can choose to generate a Visual Studio 2017
Solution for the cubemos samples, this will copy the sample sources to C:\Users%USERNAME%\Cubemos-Samples.
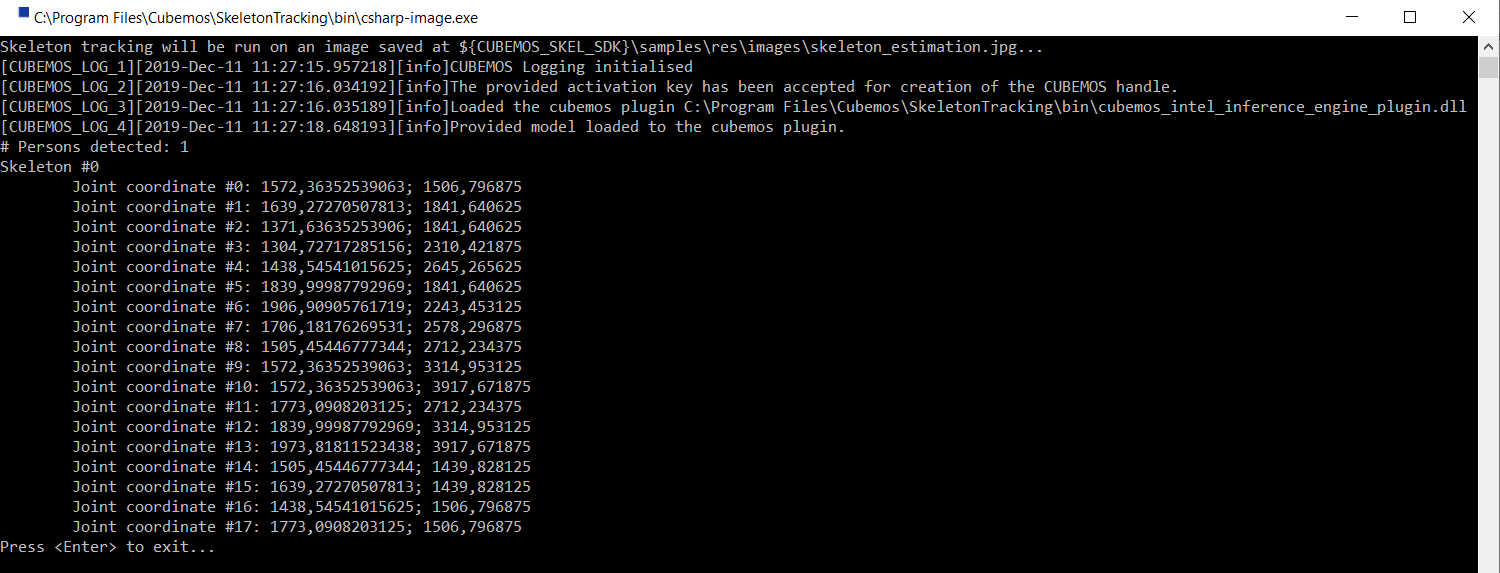
- After installation, you are able to run C:\Program Files\Cubemos\SkeletonTracking\bin\csharp-image.exe successfully.

List of joint coordinates of example image after successful installation
During the Windows installation the following environment variable is created:
%CUBEMOS_SKEL_SDK% | C:\Program Files\Cubemos\SkeletonTracking
3. Linux. Installation and license activation.
- Download the installation package by clicking this link.
- Install cubemos-SkeletonTracking_2.x.x.x.deb as root using the following command:
sudo apt-get install ./cubemos-SkeletonTracking_*.deb
- Log out and log in again to make sure that all environment variables are loaded correctly.
- To activate the software for the first time run post_installation.sh script from opt/cubemos/skeleton_tracking/scripts/ .
- In the command line dialog, enter your acquired license key.
- Then the following steps take place automatically (a., b., c., d.):
- a. The post_installation.sh script generates the license file (cubemos_license.json) and copies it, together with the neural network models and test-images, to /home/$USER/.cubemos/skeleton_tracking/

cubemos Skeleton Tracking home folder after post installation step
- b. The activation is performed.
- c. activation_key.json is saved in the license folder.
- d. make files for the cubemos samples are generated and built into /home/$USER/cubemossamples/
- After installation, you should be able to run:
bash /opt/cubemos/skeleton_tracking/bin/cpp-image

List of joint coordinates of example image after successful installation
During the Linux installation the following environment variable is created:
$CUBEMOS_SKEL_SDK | /opt/cubemos/skeleton_tracking
Updated about 1 year ago
